Hosting GitLab CI Runners
As we are a small team we focus on automating as much as possible and use Ansible a lot for our deployments but lacked a proper testing infrastructure satistying our needs (ability to run services with systemd as well as more complex container and network setups). In a previous article we deployed our Ansible role testing infrastructure but we did not explain into details how we setup our continuous intergration (CI). Let’s also rewind back a little and check what we’re doing with it and why we chose to manage our own workers.
Our Needs
Originally we needed to run our Ansible tests and check changes for our website but with time we expanded our usage to creating and publishing custom container images and DNS zone checks for our DNS system (dns4tenants).
Difficulties
CIs nowadays typically use containers, via Docker, to run workloads. Using this combination ourselves, we’ve run into a few issue along the way but the most problematic have been:
- the inability to work properly with systemd
- a working Docker in Docker setup is not trivial and not recommended upstream for various technical and security reasons (the post is linked in the official Docker documentation)
But we need these feature to run our Ansible tests: Molecule, while itself running in a container, needs to spawn nested containers to test your scenarios, and many of our deployment scenarios involve running services on traditional distros using systemd. Docker folks are not interested in these use cases, and so these issues have remained unsolved for years.
Using podman as an alternative
Podman is an alternative to Docker developed at Red Hat and we’ve taken an interest in it. We were already using it for local development, so we decided to look at it for use in our CI too. As it happens, podman has native support for systemd running inside a container and, with some configuration tweaks, it was supposed to be able to run inside itself without giving up totally on security.
What CI can we use?
We were not aware of any CI supporting podman directly and we also did not want to maintain a complex architecture. We were already using Gitlab to host our git repositories and while looking around we came upon someone attempting to run their own workers (called “runners” by Gitlab folks) with podman. That is how our experiment started.
Hosting our own runners also made sense following Gitlab’s announced changes in their offerings, which would require open source projects using more than a very small amount of CI resources to go through a very bureaucratic registration process. By hosting our own runners we could continue working as we had in the past, with public visibility, while still being able to take advantage of the free tier for some workloads.
Extra Considerations
Historically, running containers in Docker required running the containers with root privileges, which can be a security issue. One of the strengths of podman is the way it takes advantage of recent kernel features to empower unprivileged users to run all possible workloads. We want to be able to let community members contribute and get the result of CI runs without waiting for us to review and trigger the CI, and rootless podman allows us to do that without sacrificing security.
We also wanted podman to access the internet, as it’s needed for example to download packages during Ansible roles deployments, but prevent it from accessing the interface directly to avoid opening ports or do bad things. We also need IPv6 in certain workloads like testing our DNS deployment Ansible role. podman initially used slirp4netns but it does not support IPv6. Recently they released (starting at version 4.4.0) a new network stack called netavark that can improve rootless network configuration and also support IPv6.
Building the new CI
We based our work on jonasbb’s Gitlab runner hooks and improved around it and later made an Ansible role to deploy easily.
Preparing the host
We chose to use Fedora to get a more modern podman version, as at the time recent versions (4.4.x) were not yet ported to CentOS Stream. We used a VM with 8 vCPUs, 16GB RAM and 100GB storage (not counting a small 20GB disk for the system).
Since we wanted to be able to run IPv6 workloads, we needed to ensure the ipv6 kernel module was loaded; it may seem obvious but not all distros enable it by default.
GitLab provides a RPM package for the runner, signed with a key, but it was not possible to register their repository and we ended-up giving DNF the URL of the RPM to install.
Since the runner does not need anything except basic filesystem access we made a systemd override of the servide file to run as a dedicated user instead of root. For this user to be able to run long-running services we need to inform systemd using loginctl enable-linger <user>.
To run a full system in a container you need to be able to map users with a slice of the host UID/GID range; to make the delegation you need to edit /etc/subuid and /etc/subgid to add an entry for the runner’s user.
Aside from podman we also installed crun which is a variant of the container runtime runc and recommended by podman. They also recommend using fuse-overlayfs for the inside podman to communicate with the outside one better.
Registering the Runner
Registration is quite easy, you simply need to get an authentication token in the Gitlab UI (go into your organization settings and follow this screenshot) and pass it to the gitlab-runner register alongside a few other parameters.
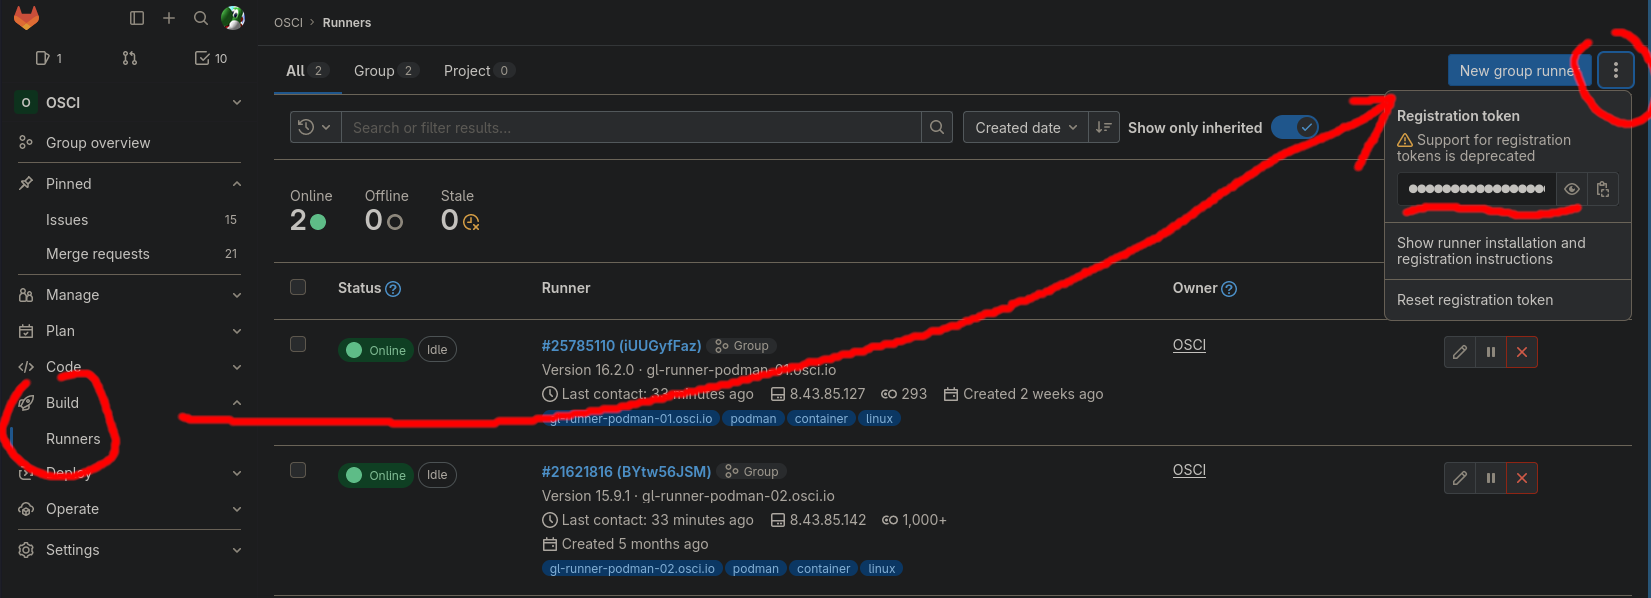
We use the custom executor which lets you specify scripts of your choosing to manage the container creation. Nowadays there’a a native podman executor but it does not let you pass parameters to podman and that’s why we’re still using the custom system.
You should also adjust the concurrency to match how much resources your host/VM will have to spare.
One important setting now is the list of tags you want to associate your runner with. If you have multiple runners it make sense to have tags to describe them but even with a single runner you at least need one to differentiate with the shared runners on gitlab.com (unless you have your own instance of course).
The tricky part is to understand how to choose the runner for a particular repo and the impact for potential contributors. By default shared runners are used but you can select a specific runner in your .gitlab-ci.yml either globally or for a specific job. You can also update the configuration of your registered runner to allow working on untagged jobs but in this case you’ll also need to disable shared runners or they’s ll be selected by default.
As for contributors, if you only use your own runners to avoid the limit of the free tier then all if fine, but if you need to run tests in a specific environment and would like to run tests for external contributions then you’ll have to either apply to premium tier or deploy your own instance.
Runner Custom Hooks
With the custom executor you can register prepare, run and cleanup scripts of your liking. For this we simply use jonasbb’s work untouched as it works really well.
The run script can be customized by dropping a custom_base.sh script that can manipulate the podman arguments, and that’s where all the magic of our system lies.
Here are the changes we make:
- allow ICMP and forwarding, so that the inner container will work fine (
--sysctl=net.ipv4.ping_group_range='0 0' --sysctl=net.ipv4.ip_forward=1 --sysctl=net.ipv6.conf.all.forwarding=1) - provide access to /dev/fuse as recommended by podman documention for the inside podman to communicate with the outside one better (
--device=/dev/fuse) - allow changing the hostname/domain (
--uts=private) - pass CONTAINER=podman environment variable that is later picked bysystemd to do some magic (
--env=container=podman) - if systemd is enabled in this runnere then:
– ensure system support in podman is enabled (
--systemd=always) – disable SELinux and seccomp as it is not working yet for inner containers (--security-opt=label=disable --security-opt=seccomp=unconfined) – add a few privileges to make the inner container work
The needed extra privileges were CAP_SYS_ADMIN, CAP_NET_ADMIN and CAP_NET_RAW until Fedora 36 with podman 4.4.1 but starting at Fedora 37 with podman 4.4.2 this is no longer sufficient and we’re now using --privileged. This is not as tight as we would have liked and we’ll investigate for better settings. In the meanwhile it’s important to note that --privileged does not give the container root power (and as a non-root user you simply would lack the mean to do so anyway) but adds a set of extra capabilities.
Conclusion
This new system has been working well for months now and despite investing few resources our PRs and daily rebuild of all projects it has been sufficient. We added a second runner for redundancy and to be able to upgrade the new one, but that was not dictated by the workload. We’d like to improve the podman settings to be more secure in the future though.
You can use our Ansible role to easily deploy an instance.